Devices #
Adding Devices #
Phones need to be added into the portal before they can be assigned to a user. Phones can be added individually using the '+ Add Device' option or in bulk using the '+ Import' option.
To add a phone, the following information is required:
- MAC Address
- Model
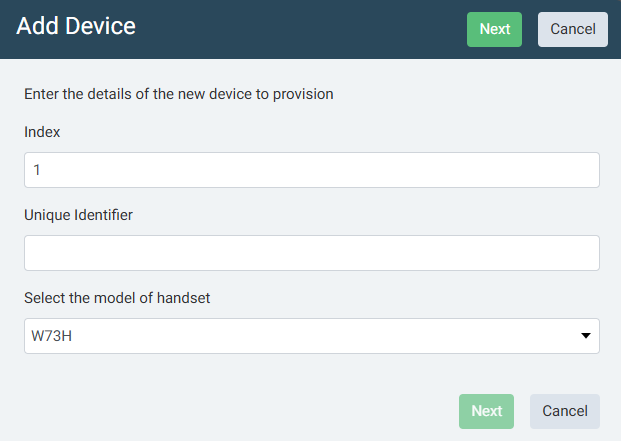
To manually add a phone, press the '+ Add Device' button, enter the phone's MAC address and then select the correct Model (the manufacturer should auto populate when the MAC address is entered).
Optionally a device type can be selected at this time. For below for more information on device types.

Once the phone has been saved, the RPS provisioning process will start.
To import a batch of phones, press the '+ Import' button, then browse to the CSV file containing the MAC addresses and models to import.
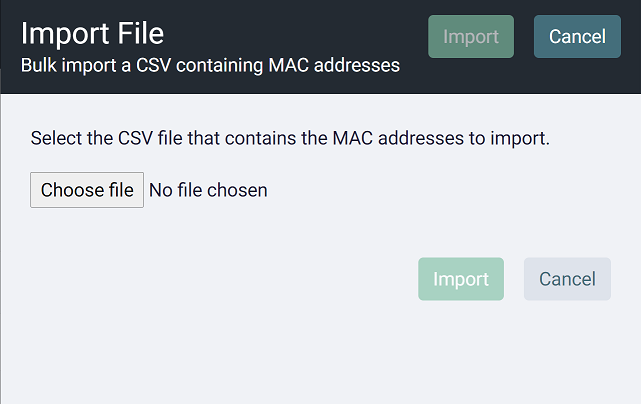
CSV Import Format
The following Fields are required for the import file:
| Field Contents | Description |
|---|---|
| MAC Address | The mac address of the phone to be imported. This can be upper or lower case and can include '-', ':' or no octet separators. |
| Model | The model of the phone. For reference, check the Phones section for a list of supported models. |
Example Rows:
"80:5E:C0:XX:XX:XX","T23G"
"80:5E:C0:XX:XX:XX","T30"
tip
The manufacturer does not need to be provided in the import, it will be automatically inferred from the MAC address.
Device Status #
As soon as a device is added, the system will attempt to claim ownership of the phone by registering it on the manufacturer's RPS server. The status of this registration process is displayed in the grid:
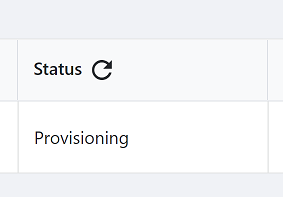
| Status | Description |
|---|---|
| Provisioning | The device is currently being added to the RPS server for zero touch provisioning |
| Provisioned | The device has been added to the RPS server successfully |
| Error | An error occurred adding the device to the RPS server |
If there is a problem registering the device with the manufacturer's RPS server, the phone will not automatically provision with ~.Dimensions.~ when it boots up. This can happen for any of the reason highlighted below.
Mis-typed MAC Address Double check that the MAC address entered for the phone is correct. If the MAC address is wrong, it may not be possible to provision with the RPS.
note
The phone may still provision successfully with the RPS if the mis-typed MAC address is valid for a different phone.
Phone Already Exists If the phone already exists on the manufacturer's RPS server then it will not be allowed to be registered a second time. To fix this issue, one of the following actions must be performed:
- Remove the phone from the last communications platform it was connected to
- Contact the manufacturer providing proof of ownership to have it manually removed from the RPS
Once the phone has been removed from the alternate RPS account, simply edit the phone and re-save through the portal to kick of the provisioning process again.
Assigning Devices #
Device Types #
When assigning a device, one of the 3 available device types needs to be selected:
- User device -> Users can have one or more devices assigned
- Phone Only device -> Stand-alone devices with an extension number for use in conference rooms etc
- Hotdesk device -> Stand-alone devices for emergency calls and hot-desking into by users.
note
The device type cannot be changed once the device has been assigned. To change a device's type, it will need to be removed and re-added.
Select the devices to assign from the grid and then press the 'Assign' button.
Select the device type from the combo box. When a User device is selected, a user from the customer account needs to be selected. When a Phone Only device is selected, enter an available presence ID for the device.
note
As soon as a device has been assigned to a customer and given a device type, it will be provisioned on the communications platform and can be deployed.
Multi-Account Devices #
SIP devices which are designed to be support multiple users (such as DECT base stations) have an additional 'Child' device configuration. Simply add the base device the same way as a normal device and assign it to a customer account.
Once added, child devices can be added by expanding the child grid using the '+' icon and then press the 'Add Child Device' button.
info
Due to their support of 'Child' devices, devices marked as 'Multi-device' do not support normal sub account configuration.

For DECT child devices, the following settings are required:
- Account Index -> SIP account number on the base station
- Unique Identifier -> The unique id for the handset being linked
- Model -> The model being linked
Once these details have been entered, select the device type and assign a number or select a user as per a normal device.
info
Child devices can only be created for users on the same customer as the base station.
Locked Devices #
To increase the security for SIP phones, once a phone has successfully connected to the ~.Dimensions.~ portal and downloaded it's configuration, the phone will then be locked and will not be provided configuration again if:
- It gets defaulted and loses its unique configuration
- The IP address the device is connecting from changes.
If for any reason the phone gets defaulted and needs to be added to the system, or the phone's remote IP address changes, the phone will need to be unlocked first.
Phones can be easily unlocked by clicking the padlock in the Devices grid, either in the main 'Phones' section or under a specific Customer.
tip
Make sure you check the 'Include Assigned Devices' check box, by default, only unassigned devices are displayed in the grid.
info
Phones can only ever be unlocked for a 24 hour period. If the phone does not request it's initial configuration within this time period, it will need to be unlocked again.