Mitel 68xx Phones #
Automatic Provisioning #
After a factory default, 68xx phones will follow the auto-provisioning process just once. In order for automatic provisioning to work, ensure that the phone has been added to ~.Dimensions.~ before it is plugged in or reset to defaults.
If a phone does not seem to be automatically provisioning, reset it to factory defaults again using the phone's settings menu:
- Press the cog key on the phone
- Press the 'Advanced' softkey button
- Enter the default code '22222'
- Navigate to the 'Reset' menu option and press 'Select'
- Ensure 'Factory Default' is selected and press 'Select' again
At this point the phone should reboot and if it has been configured on the ~.Dimensions.~ portal and has been assigned to a user, it will download its configuration.
info
During this process the phone may perform a firmware update.
Web Recovery Mode #
If a 68xx fails to connect to a provisioning server too many times, it may go into Web Recovery mode. To exit this mode, it must be provided with a new version of software using a TFTP server.
- Download the (.st) firmware file matching the phone's model from Mitel's website
- Open a web browser and access the IP address indicated on the phone
- On the web page, click the 'Upgrade Software' button
- Select 'Choose File' and browse the to the .st file from stage 1
- Select 'Upgrade' to start the upgrade process
Once these steps have been completed, the phone should reboot, allowing the normal automatic provisioning process to be followed.
info
It can be useful to force a phone into 'Web Recovery Mode' if it is stuck in a boot loop which is stopping access to settings. To do this, hold down the keys 1 and # while the phone reboots.
Manual Provisioning #
If there are problems with the Poly Zero-Touch provisioning service or the phone does not have network access to it, you may need to provide the details to the phone manually on how to talk to the ~.Dimensions.~ system.
To complete manual provisioning, you will need the phone's provisioning URL combination from the Device Configuration area.
Log into the phone's web UI and navigate to the 'Settings\Provisioning Server' section.
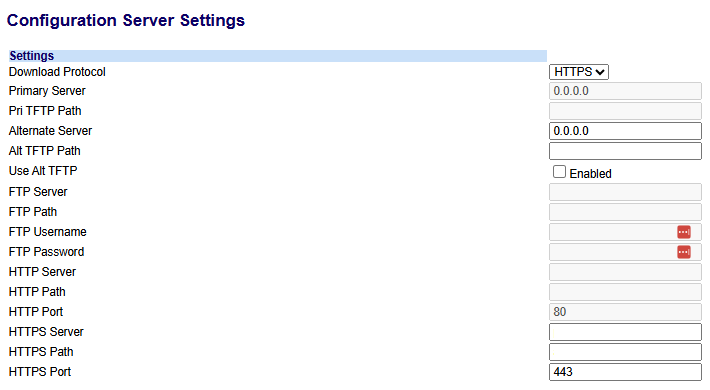
Ensure the Download Protocol is set to 'HTTPS' and then populate the following options and save the settings down to complete the provisioning process:
- HTTPS Server -> provisioning URL without the protocol, port or folder path. (e.g. provisioning.xarios.cloud))
- HTTPS Path -> aastra
- HTTPS Port -> 443
tip
Ensure the device is unlocked in the ~.Dimensions.~ portal.
info
Once provided, the phone should query the required configuration and reboot as required.
802.1x #
Supported 802.1x Types:
- EAP-TLS
- EAP-MD5
EAP-TLS
For EAP-TLS support, the certificates/keys need to be hosted where they can be accessed by URL for the Mitel 68/69xx phones to download.
Provide URLs for each of the certificates and private keys required in the configuration.
Example
Here is an example of the fields that should be configured in the ~.Dimensions.~ portal for 68/69xx phones.
| ~.Dimensions.~ Config | Mitel 68/69xx Config | Notes |
|---|---|---|
| Identity | identity | Specifies the identity or username used for authenticating the phone. |
| Root / Intermediate Certificate | 802.1x root and intermediate certificates | Specifies the file name that contains the root and intermediate certificates related to the local certificate. To download a specific file, the string value MUST HAVE A FILENAME at the end of the string. For example: ftp://admin:[email protected]:50/path/phones802TrustedCert.pem where 'path' is the directory and 'phones802RootCert.pem' is the filename. If you do not specify a filename, the download fails. |
| Trusted Certificate | 802.1x trusted certificates | Specifies the file name that contains the trusted certificates. To download a specific file, the string value MUST HAVE A FILENAME at the end of the string. For example: ftp://admin:[email protected]:50/path/phones802TrustedCert.pem where 'path' is the directory and 'phones802TrustedCert.pem' is the filename. If you do not specify a filename, the download fails. |
| Private Key | 802.1x private key | Specifies the file name that contains the private key related to the local certificate. To download a specific file, the string value MUST HAVE A FILENAME at the end of the string. For example: ftp://admin:[email protected]:50/path/phones802TrustedCert.pem where 'path' is the directory and 'phones802Private.pem' is the filename. If you do not specify a filename, the download fails. |
| Local Certificate | 802.1x local certificate | Specifies the file name that contains the local certificate. To download a specific file, the string value MUST HAVE A FILENAME at the end of the string. For example: ftp://admin:[email protected]:50/path/phones802TrustedCert.pem where 'path' is the directory and 'phones802LocalCert.pem' is the filename. If you do not specify a filename, the download fails. |
info
The following settings are automatically enabled when 802.1x settings are configured on 68/69xx phones:
- pc port passthru enabled: 1
- 802.1x mutual authentication: 1
For more information, check the Mitel 68xx Administrator Guide.
EAP-MD5
For EAP-MD5 support, populate the 'Identity' and 'Password' fields in the phone's configuration or customer-wide configuration.
Custom Configuration Files #
The addition of custom configuration files is supported for Mitel 68xx phones. The configurations are entered in a simple key/value pair, with a colon separating them.
The example below shows how to disable the Live Dialpad feature (remember to enter each configuration item on a separate line):
live dialpad: 0info
For details of all the configuration options available, refer to the Mitel 68xx Administrator Guide. Alternatively, through a phone's web interface, configure the item required and then download the local.cfg file from the phone (on the Troubleshooting page). In this file you will be able to see how the configuration item is formatted.